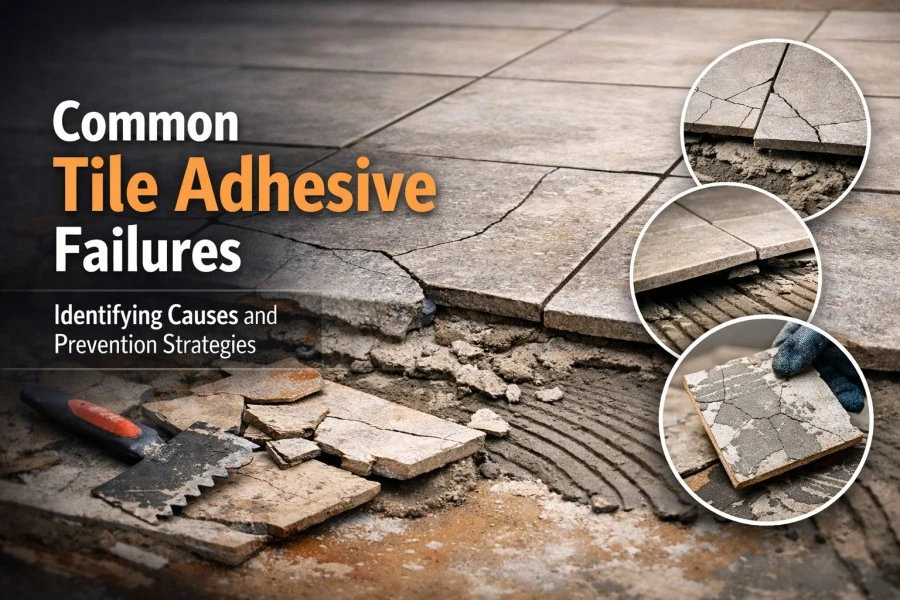
The characteristics that make tiles popular as a surface finish in both residential and commercial applications include their durability, hygiene and aesthetics.
However, the long-term viability of any tiling system is due more to the quality and greatness of the adhesive beneath it than it is to the tile itself.
When this all-important layer breaks down or fails, the potential outcomes can result in anything from minor aesthetic issues up to major safety problems.
Table of Contents
Since builders, contractors and applicators who want to provide good, long-lasting tile installations must assess common tile adhesive failures, as well as their causes and how to avoid them, the majority of failures are frequently the result of improper product selection, poor workmanship, or a disregard for site conditions.
This blog post looks at some of the most common signs associated with adhesive failure and provides practical recommendations which may assist in preventing these problems.
Signs of Adhesive Failure
By identifying adhesive-related issues early on, you can potentially avert any further damage and/or reduce the cost of repair. Common visual signs associated with adhesive failure include:
- Tapping on a tile produces a hollow sound – indicating that there is no longer solid contact between the tile and the adhesive bed.
- Tiles are loose or rock under foot traffic.
- Tiles crack due to inadequate or uneven support from the adhesive.
- Grout is crumbling or cracking due, again, to the movement of the tile
Signs of Installations Problems:
- Efflorescence (white powder) formed by moisture being held in
- Tile heights (uneven) resulting from different amounts of adhesive being used
- If you see any of the above signs, it usually means there is one or more installation problems with the tile installation.
Common Causes and Solutions for Tile Adhesive Failure
1. Wrong Tile Used:
Cause: Different tile types have various levels of porosity, size, thickness, and load capacity. Using wall tile on the flooring or a lightweight tile in a very active location will overload the adhesive system.
Solution: Always have tiles suited for the location they are being installed: Is the tile being installed on a floor, wall, inside, outside, or wet? Is the size/weight compatible with what the adhesive can hold and the surface being installed?
2. Wrong Type of Adhesive Used:
Cause: You cannot use the same type of adhesive for all the tile types and locations. Using a general type of adhesive plus using it for large sizes/vitrified tiles will always result in a poor bond.
Solution: Use the tile manufacturer’s recommendations; utilise an adhesive appropriate for each tile type, substrate, exposure condition, and location.
3. A Non-Trained / Non-Skilled Installer/Applicator:
Cause: Lack of background knowledge will result in poor mixing, placement problems and/or not doing the appropriate steps.
Solution: Have trained individuals installing tiles and provide on-site training regularly to your workers. Trained people will substantially reduce the risk of tile adhesive failure.
4. Insufficient Surface Preparation:
Cause: Surface conditions such as dust, oil, loose debris, or uneven surface will prevent a proper bond to the adhesive.
Solution: Clean the substrate thoroughly and bring it to a Saturated Surface Dry (SSD) condition. Repair cracks, level uneven surfaces, and prime highly porous substrates where required.
5. Incorrect Tile Adhesive Formulation:
Cause: Low-quality formulations lacking essential additives can compromise bonding strength and flexibility.
Solution: Use well-formulated adhesives that meet performance standards and are suitable for modern tile systems.
6. Lack of Polymer Modification:
Cause: Non-polymer-modified adhesives are rigid and unable to absorb movement or thermal expansion.
Solution: Polymer-modified adhesives like single polymer improve flexibility, adhesion, and water resistance, reducing the risk of debonding and cracking.

7. Tiling Over Immature Substrate:
Cause: Tiling on new concrete or plaster without allowing for a full cure before beginning the tile installation traps moisture beneath the tiles and can push the adhesive layer off the base.
Solution: Allow all substrates to cure completely (typically 28 days for concrete) and perform a maturity test on all substrates to make sure they are mature prior to installing tile.
8. Improper Water Ratio & Mixing:
Cause: Too much or too little water in mixed adhesive will negatively affect the strength, cure time, and consistency of the adhesive installed with that adhesive.
Solution: Properly follow the manufacturer’s recommended water-to-powder ratio and thoroughly mix to ensure you have a consistent, non-lumpy mixture.
9. Incorrect Installation Techniques:
Cause: Not following the correct installation technique can lead to a lack of coverage as the installer does not have a consistent hole that is pulling up off the substrate with a consistent angle to the trowel during application.
Solution: Use the correct notched trowel, maintain a consistent angle while creating consistent adhesive ridges.
10. Not Allowing Enough Curing Time:
Cause: If you grout or walk on a tile surface before the adhesive has fully cured, you will not create the necessary bond to the substrate.
Solution: Follow the cure times listed in the technical data sheets when tiling and protect the tile from foot traffic during the curing period.
11. Ignoring Environmental Conditions:
Cause: Temperature, humidity, and cold weather all affect how long it takes for adhesives to cure and how long the tile has to stay open before the installer can begin to install tile.
Solution: To avoid these conditions, do not tile in extreme weather, adjust the work schedule and do not allow the surface to be exposed to the sun immediately after the tile installation, and maintain good working conditions.
12. Seepage within the Substrate:
Cause: The presence of a leak or dampness from water on the walls due to a leak can greatly negatively impact the performance of your adhesive.
Solution: Identify and fix seepage issues before tiling. Apply waterproofing where necessary and allow surfaces to dry completely.
13. Inadequate Adhesive Coverage:
Cause: Partial adhesive contact leaves voids under tiles, leading to hollow sounds and cracks.
Solution: Ensure full adhesive coverage using proper troweling techniques. Always aim for maximum contact between tile and substrate.
14. Incorrect Adhesive Thickness:
Cause: Excessive thickness increases shrinkage and reduces strength.
Solution: Maintain recommended adhesive thickness; the thinner and more uniform the adhesive layers, the higher the strength.
15. Improper tile spacing (tile joints spaced too close):
Cause: Not leaving a space between tiles does not allow for thermal expansion and contraction, which puts stress on the tiles, leading to cracking.
Solution: Use spacers to achieve uniform joints between tiles. Fill tile joints with appropriate grout, and provide movement joints around the perimeter.
16. Lack of compressive force (tile mats):
Cause: Air trapped under the tile reduces the bonding area.
Solution: Tap tile with a rubber mallet after installation, starting from the centre and working outwards to eliminate any air pockets.
17. Heavy Impact or Loading:
Cause: Excessive foot traffic, dropping objects onto tile, or excessive loading all contribute to exceeding the bond capacity of the adhesive.
Solution: Use high-strength adhesives that are intended for load-bearing applications, and ensure that the substrate is structurally sound.
Conclusion:
Tile adhesive failures occur to the greatest extent because of preventable factors; i.e. the failure of the adhesive is not an inherent failure of the adhesive itself but rather a result of skipping or misunderstanding important steps when selecting and installing the adhesive system(s).
Each step in the installation process, from substrate preparation through adhesive selection through environmental awareness to adhering/curing discipline have an equal and vital impact on the successful performance of the finished installation.
In the long run, it will be more cost-effective to spend the time required for the correct process during installation instead of having to repair failed installations.
The result of installing the adhesive correctly is a strong bond between the tile and substrate, a durable finish that lasts, and satisfied end-users.
Frequently Asked Questions:
1. What is the most common reason for tile adhesive failure?
Tile adhesive failures are most often caused by inadequate substrate preparation. When there is debris on the substrate (dust, oil, loose particles) or excess moisture in the substrate, they inhibit a proper bond and will result in tile failure due to hollow-sounding tiles and the end result of tile de-bonding.
2. Can tile adhesive fail even if a good-quality product is used?
Tile adhesive can fail regardless of the quality of the tile adhesive if the adhesive is not mixed properly, applied at the incorrect thickness, or installed in temperature/humidity conditions that are inappropriate. Therefore, a quality product must also be supported with proper installation methods.
3. Why do tiles sound hollow after installation?
When tiles sound hollow after they are installed, this usually indicates that there is insufficient adhesive on the tile surface or that there is trapped air beneath the tile. A common cause of hollow-sounding tiles is when the installer did not back-butter the tile or combed out the adhesive with the trowel correctly.
4. Is it safe to tile over fresh concrete or plaster?
No, you cannot install tile over freshly poured concrete or freshly plastered surfaces. Installing tile over a non-cured substrate will trap moisture in the substrate and severely weaken the bond of the adhesive to the tile. Concrete and plaster must be allowed to cure completely (generally around 28 days) before installing tile over the surface.
5. Does tile size affect adhesive performance?
Yes, tile size greatly impacts the adhesive. Large-format tiles will require the use of polymer-modified adhesives as well as full coverage installation techniques. If the proper adhesive is not selected and the tile is not back-buttered, the likelihood of cracking and feeling de-bonded will increase.
Sagar Telrandhe is a Construction Engineer with a B.Tech in Construction Engineering & Management. Passionate about infrastructure development, project planning, and sustainable construction, he specializes in modern construction techniques, project execution, and quality management, contributing to efficient and innovative building.